What's new

The TYM Ultra-Mega Hitbox Thread

aj1701

Noob
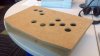
I'm building my own hitbox like controller (well, with help from a friend). I got the layout I wanted, which is similar to the Hitbox layout for the directions but with the Mortal Kombat 3 attack button configuration.

I have two layouts, both made with MS Visio 2007. One has all 24mm button holes, except up which is 30mm. That ended up feeling too small for me, so there's also one where all the button holes are 30mm, which is what mine will be.

The panel is 10"x16", when you print you can print on the standard size 11"x17". A black border shows you the actual 10x16. Please note that the diagram is US Imperial, so the button sizes are approximate! If you drill, use an actual 24mm or 30mm bit. Otherwise though the center markers should line up fine (I tried really hard to make the measurements exactly match the MK configuration). Also, the directions are in comfortable position for me, you should probably print and see if it works for you.

If someone uses this let me know; I'd love to see how the controller turns out!
 

Attachments

Dizzy

False Information Police Officer
Premium Supporter
NetherRealm Studios
That thumb placement seems quite low. Be sure to test how it feels.

soonk uses something similar to MK config hitbox too
 

aj1701

Noob
That thumb placement seems quite low. Be sure to test how it feels.

soonk uses something similar to MK config hitbox too
Ya that's why we did the test drill. This is actuallly the second drill; the first was on plywood. It works for me; my hands are a bit larger than average. I placed the up button in line with the run / throw button, then the other directions I placed by seeing where my fingertips rested naturally.

I've seen soonk 's configuration before in another thread. I had considered trying to see if I could place another button to use for tag, but there didn't seem a natural place without going to the standard six button straight layout and I really wanted an MK hitbox. :)

Soonk, I'd be curious to know, is that button next to 1 and 3 easy to access. Do you find the MK layout more comfortable with the slight rotation counterclockwise? For me I know the normal MK layout is comfortable; the stick I have now is standard MK so I've gotten used to it.
 

GGA soonk

ĜĞÅ §ººñ|<®©™
Yes. When I play my hands are slightly tilted in; something I've been doing since my PC gaming days, so I just placed my hands down and that's where my fingers ended up. As you can see I changed my mind on the jump button, decided it was uncomfortable after a while.

The extra button is my flip stance button. It's in a fine place because I only use it for Xray, so it's just that and the block button there in the middle.
 

aj1701

Noob
That looks legit, wish I had the skill/time/money to customize one!
LOL. I just created the layout in Visio and printed it a few times. When this thing is done, all I've done is put the components into the box and wire it together, and apply the artwork. Actually building of the box and the art I've outsourced. ;)

I'm hoping my friend will be able to do the box soon, I want to get this thing done!
 
Yea, maybe itll be fine for you but on my all 30mm model I started with jump being that low and ended up moving it up. In my latest build I ended up just doing the actualy hitbox layour with 24 mms
 

GGA soonk

ĜĞÅ §ººñ|<®©™
Are there any problems with the Paewang when hitting left and right at the same time? Can you tell me what happens, ie neutral, always left, etc?
 

eks

Noob
That thumb placement seems quite low. Be sure to test how it feels.
Since people's hands are different sizes, it makes sense to adjust it for your hands. I just laid my hand on the board in a relaxed position to find where I wanted the buttons.
 

Sasuga

Noob
I'd personally place the jump button where you have the run button so you operate it with your right thumb then place the other motion buttons accordingly so you can also use it with you left thumb if needed. But then you'd have a problem placing the run button. I'd leave that out entirely but I don't play the MK's that use it anyway.

I'd use the default hitbox layout. Works fine for MK.
 

aj1701

Noob
Yea, maybe itll be fine for you but on my all 30mm model I started with jump being that low and ended up moving it up. In my latest build I ended up just doing the actualy hitbox layour with 24 mms
Ya obviously I haven't gotten to use the layout for real, but I did try pushing the buttons with the layout like it is and it seemed fine. I started off doing 24mm on the first test drill for all but the jump button, but for the attack buttons I had force my fingers open to keep on the button, if that makes sense. As it is with the 30mm buttons 3 and 4 I'm only half covering them while my finger tips rest fine on the 1 and 2. The way I'm building it though is that it shouldn't be a problem if I need to redo things. The panel should be easily removable and I'm using quick connects for the buttons, so if I need to change it out I'll have that option.

Btw i dunno what PCB yer gunna use but I recommend a paewang. Super easy and dual console.
I got the Multi-Console Cthulhu for godlikecontrols.com. I don't have a need for xbox support ATM, but if I wanted to add support I'd be another fun project to add in the necessary boards. :)

Since people's hands are different sizes, it makes sense to adjust it for your hands. I just laid my hand on the board in a relaxed position to find where I wanted the buttons.
Yup, that's what I did. First few times just using the printed layout, made several revisions. Then he did a test drill and made a few more changes, and the second drill seems to fit me fine. But I guess we'll see after its together and I've used it an extended amount of time!
 
I have a hitbox with a MC-Chtulu PCB and I want to use it on XboX360. I just want to know if I can dual mod it on my own because I don`t live in the USA and I doubt someone arround here can do it. What kits, cables do I need?
 

axeman87

Noob
Nice. You putting T-moulding around it?

Also, Looks like the bottom is going to be enclosed and part of the main structure, so how to plan on wiring it up? I would think the top plate would be independent for this kind of box, but I cant see any Start/Select etc buttons on the cover plate and wiring in side fixed buttons on moveable cover plate is hairy.
 

aj1701

Noob
Nice. You putting T-moulding around it?

Also, Looks like the bottom is going to be enclosed and part of the main structure, so how to plan on wiring it up? I would think the top plate would be independent for this kind of box, but I cant see any Start/Select etc buttons on the cover plate and wiring in side fixed buttons on moveable cover plate is hairy.
Ya, I'm planning on having T-molding around it when its done.

The plan is to have the top open, with a latch in the front to keep it closed. The hindges are also going to lock out so that when its fully open it will stay open, allowing me to work on it, which will be especially helpful if I want to dual mod in the future or if I end up needing socd cleaning. Select, start and PS will be on the left side, and l1 and l2 on the right side.

That's a good point about the wiring of the side buttons. I haven't chosen where the PCB should be. Any tips? This is my first go at this. I'll talk to my friend who's actually constructing the box to see what he thinks as well, he's pretty good with this stuff.
 

axeman87

Noob
I was going to have a flip-top lid for my latest stick (you can see it here if your interested...http://testyourmight.com/threads/my-custom-mk-stick.14197/#post-305059 ), but I also wanted a nice clean top with only the play buttons on top & the function buttons on the side. Here was my dilemma IMO.

If you going to have a flip-top all the electronics needs to be on the lid, or at least as much as possible. If there are wires fixed to the box (the buttons & USB) wired to a lid that moves you'll have wires moving around and there is no way to avoid this at all.

The USB isnt such a big deal since you can fit the PCB close to the rear hinge/tilt point and also have the USB plug on the box itself right next to it, so movement is minimal and since its away from the buttons and joystick its not likely to get in the way too much. Also, the USB cable is much thicker and less likely to break or catch on anything.

The buttons however are different however since the wire will be much thinner and more likely to catch on things and/or break from movement when the lid is opened.

If you're going to do it, I would apply the same theory to the USB plug. Have the PCB at the rear of the cover plate, and the function buttons on the back. This way you'll only need to allow enough wire/cable for a short distance. I would join all the function wires so its thicker as well to avoid it catching.

In the end, the more I thought about I realised that it was more trouble than it was worth. I'm wasn't going to be opening the lid much at all, if ever so why bother? In the event I need to access the electronics again I just unscrew the bottom plate.

For my next stick, which I'm working on now I want to be able show the wiring so I'm simply using a perspex bottom. I'm not even thinking about flip-top lids anymore. Putting the cable inside the box the would be nice, but I just sit it around the stick or in my pocket, no big deal.